Anniversary Banner Editing: Photoshop Guide
Anniversary Banner Editing: Photoshop Guide
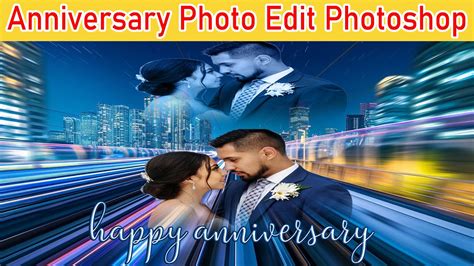
Hey guys! So, you’re looking to whip up some awesome anniversary banners for a special occasion, and you’ve got Photoshop in your toolkit? You’ve come to the right place! Editing anniversary banners in Photoshop is a fantastic way to add a personal, professional, and super heartfelt touch to celebrations. Whether it’s for a business milestone, a wedding anniversary, or any other significant yearly event, a well-designed banner can really make it pop. We’re going to dive deep into how you can transform your ideas into stunning visuals, making sure your anniversary banner editing skills are on point. Get ready to explore some cool techniques, handy tips, and maybe even discover a few hidden gems within Photoshop that will elevate your banner game. Let’s get this party started and make those anniversaries look absolutely unforgettable!
Table of Contents
Creating Stunning Anniversary Banners with Photoshop
When it comes to
creating stunning anniversary banners with Photoshop
, it’s all about blending creativity with the right technical know-how. First things first, you need to nail down the vision for your banner. What’s the vibe? Is it romantic, celebratory, professional, or nostalgic? Your
Photoshop
journey begins with setting up your canvas correctly. Head over to
File > New
and define your dimensions. Think about where this banner will be displayed – will it be for social media, a website, or perhaps a print poster? For web use,
72 dpi
is usually fine, but for print, you’ll want
300 dpi
. Resolution is key, guys! Color mode is another crucial setting;
RGB
for web and
CMYK
for print. Once your canvas is prepped, the real fun begins: layering!
Photoshop
is all about layers, and they are your best friends for anniversary banner editing. Start with a background that complements your theme. This could be a solid color, a gradient, a textured image, or even a subtle pattern. Don’t be afraid to experiment! You can find fantastic royalty-free images on sites like Unsplash or Pexels if you need inspiration. The key is to create a foundation that doesn’t overpower your main elements. Next, import your text. This is where you’ll convey the message of your anniversary. Choose fonts that match the tone – elegant script fonts for romantic anniversaries, bold sans-serifs for corporate milestones. Play with font sizes, weights, and colors.
Anniversary banner editing
often involves highlighting the number of years being celebrated, so make that prominent! You might want to use a larger font size, a contrasting color, or even a decorative element around the numbers. Adding images is another vital step. This could be photos of the couple, the company logo, or relevant celebratory imagery like balloons, confetti, or floral elements. Remember to use high-resolution images to avoid pixelation. If you need to resize or adjust images, use
Edit > Transform
options (like Scale, Rotate, Skew, Distort, or Perspective) and hold down the
Shift
key while dragging a corner to maintain proportions. When placing text and images, use
Photoshop’s
alignment tools (
Window > Align
) to ensure everything looks neat and professional. Don’t forget about the visual hierarchy – guide the viewer’s eye to the most important information first. Effects and adjustments are where you can really add that
wow
factor. Use layer styles like drop shadows, outer glows, or bevels to add depth and dimension to your text and graphics. Adjust the brightness, contrast, and color balance of your images using
Image > Adjustments
or adjustment layers. Adjustment layers are non-destructive, meaning you can always go back and tweak them later, which is a huge plus in
Photoshop
. Consider adding subtle textures or overlays to give your banner a unique feel. Finally, save your work! Save a layered
.PSD
file so you can always come back and make edits. Then, export for your intended use (
File > Export > Save for Web (Legacy)
for web or
File > Save As
for print, choosing appropriate formats like JPG, PNG, or PDF). Mastering
anniversary banner editing in Photoshop
is a journey, but with these foundational steps, you’re well on your way to creating banners that truly shine and commemorate those special moments in style. Keep practicing, guys, and don’t be afraid to get creative!
Essential Tools and Techniques for Anniversary Banner Editing
Alright, let’s talk about the
essential tools and techniques for anniversary banner editing
in
Photoshop
. To make your banners truly shine, you need to get comfortable with a few key players in the Photoshop toolbox. We’ve already touched on layers, but let’s really emphasize their importance. Every element – background, text, images, decorative graphics – should ideally be on its own layer. This gives you maximum flexibility to move, resize, adjust opacity, and apply effects independently without messing up other parts of your design. Think of it like building with LEGOs; each brick (layer) can be placed, removed, or swapped out easily. For text, the
Type Tool (T)
is your go-to. Beyond just typing, explore the
Character
and
Paragraph panels
(
Window > Character
,
Window > Paragraph
) for fine-tuning. Here you can control leading (line spacing), kerning (space between specific letter pairs), tracking (overall letter spacing), and alignment. These subtle adjustments can make a huge difference in readability and visual appeal. When adding dates or significant numbers, consider using the
Shape Tools (U)
to create custom number elements or embellishments. You can fill them with colors, gradients, or even place images inside them using clipping masks (more on that in a sec!). Speaking of images, the
Selection Tools
are crucial. Whether it’s the
Marquee Tools (M)
,
Lasso Tools (L)
, or the incredibly powerful
Object Selection Tool
and
Quick Selection Tool
, mastering selections allows you to isolate parts of images you want to use or remove backgrounds cleanly. The
Pen Tool (P)
is the ultimate tool for precise selections and creating custom shapes, though it has a steeper learning curve. Once you’ve selected an image or part of one, you might want to place another image or texture
inside
it. This is where
Clipping Masks
come in handy. Simply place the image or texture layer
above
the layer you want to clip it to, right-click on the top layer, and choose
Create Clipping Mask
. Voila! The top layer will only appear within the boundaries of the layer below it. This is a fantastic technique for anniversary banners, like putting a romantic photo inside a heart shape or a metallic texture within the numbers. Don’t underestimate the power of
Adjustment Layers
. Accessed through the
Layers
panel (
Window > Layers
), clicking the half-filled circle icon at the bottom, they allow you to make non-destructive color and tonal adjustments.
Brightness/Contrast
,
Hue/Saturation
,
Color Balance
, and
Curves
are your best friends for making photos look cohesive and enhancing the mood of your banner. For adding visual flair,
Layer Styles
are a must-know. Double-click a layer (but not on the layer thumbnail or name) to open the
Layer Style
dialog box. Here you can add
Drop Shadow
,
Inner Shadow
,
Outer Glow
,
Inner Glow
,
Bevel and Emboss
,
Stroke
, and
Color/Gradient/Pattern Overlay
. Use these sparingly and thoughtfully to add depth, highlight text, or create unique effects. For example, a subtle drop shadow can lift text off a busy background, making it more readable. For adding decorative elements,
Brushes
can be incredibly versatile.
Photoshop
comes with many default brushes, and you can download countless more online. Use brushes to create subtle textures, add glitter effects, or draw decorative flourishes. Experiment with brush size, hardness, opacity, and blending modes. Speaking of
Blending Modes
(found in the Layers panel dropdown, usually set to ‘Normal’), they control how layers interact with each other. Modes like ‘Screen’, ‘Multiply’, ‘Overlay’, and ‘Soft Light’ can create sophisticated effects, blend textures seamlessly, or add color. Finally,
Smart Objects
are a lifesaver. When you place an image into your document or convert a layer to a Smart Object (
Layer > Smart Objects > Make Smart Object
), you can transform it (scale, rotate, distort) without losing quality. Any edits made through filter layers applied to Smart Objects are also non-destructive. So, mastering these
Photoshop
tools and techniques – layers, text controls, selection tools, clipping masks, adjustment layers, layer styles, brushes, blending modes, and Smart Objects – will significantly boost your
anniversary banner editing
capabilities. Keep experimenting, guys, and remember that practice is key to unlocking these powerful features!
Designing Visually Appealing Anniversary Banners in Photoshop
Now, let’s shift our focus to the art of
designing visually appealing anniversary banners in Photoshop
. It’s not just about putting elements together; it’s about creating something that is not only informative but also aesthetically pleasing and emotionally resonant. When you’re editing an
anniversary banner
, think about the overall composition. A well-balanced composition will draw the viewer in and make your message clear.
Photoshop
offers grids and guides (
View > Show > Grid
,
View > New Guide
) that can help you align elements precisely and create a harmonious layout. The rule of thirds is a classic design principle that can be applied here: imagine dividing your banner into nine equal parts by two horizontal and two vertical lines. Placing key elements along these lines or at their intersections often results in a more dynamic and engaging composition. Color theory is another critical aspect. The colors you choose for your anniversary banner will evoke specific emotions and set the tone. For a wedding anniversary, you might opt for soft pastels, romantic reds, or elegant golds. For a business anniversary, perhaps blues, silvers, or blacks for a sense of professionalism and achievement. Use
Photoshop’s
color tools to experiment. The
Color Picker
,
Swatches panel
(
Window > Swatches
), and
Eyedropper Tool (I)
are your allies. Consider using a limited color palette – usually 2-3 main colors plus accents – to maintain consistency and avoid a cluttered look.
Photoshop’s
Kuler panel
(now Adobe Color) can help you generate harmonious color schemes. Typography plays a huge role in visual appeal. As mentioned before, font choice is vital, but so is how you arrange the text. Ensure good contrast between your text color and background color for maximum readability. If you have a lot of text, break it up into smaller chunks or use bullet points. Consider using different font weights or styles within the same font family to create emphasis without introducing too many different typefaces, which can make a design look messy. Negative space, or
whitespace
, is your friend! Don’t feel the need to fill every inch of the banner. Empty areas allow your design elements to breathe and help direct the viewer’s attention to the most important parts. It makes the overall design feel cleaner and more sophisticated. Visual hierarchy is paramount. What do you want people to see first? The anniversary year? The names? The event details? Make these elements larger, bolder, or a contrasting color. Use
Photoshop’s
layer ordering and positioning to guide the eye naturally through the information. When incorporating images, ensure they are high-quality and relevant. If you’re using photos of people, make sure they are well-lit and perhaps use subtle retouching tools like the
Spot Healing Brush
or
Clone Stamp Tool
if needed, but don’t overdo it – authenticity is often key for personal anniversaries.
Photoshop’s
Transform tools
and
Warp tool
(
Edit > Transform > Warp
) can be used creatively to bend or shape images to fit your design. Adding subtle decorative elements can enhance the appeal. Think about elegant borders, confetti overlays, subtle sparkles, or floral motifs. Use
Photoshop’s
brushes, custom shapes, or even imported graphics. Remember to use
Blending Modes
and
Opacity
adjustments to integrate these elements seamlessly. For instance, a soft glow effect or a light texture overlay can add depth without being distracting. Finally, get feedback! Sometimes a fresh pair of eyes can spot things you might have missed. Ask a friend or colleague to look at your
anniversary banner editing
draft and see if the message is clear and if the design is appealing. Iteration is a natural part of the design process, and
Photoshop
makes it easy to make changes. By focusing on composition, color, typography, negative space, hierarchy, image quality, and decorative elements, you can create
anniversary banners in Photoshop
that are not just visually appealing but also deeply impactful and memorable. Keep practicing these
Photoshop
design principles, guys, and your creations will surely impress!
Common Pitfalls and How to Avoid Them in Photoshop Anniversary Banner Editing
Even with the best intentions and skills,
common pitfalls
can pop up during
Photoshop anniversary banner editing
. Knowing what to watch out for can save you a ton of time and frustration, ensuring your final banner looks polished and professional. One of the most frequent mistakes is
low-resolution images
. Using images that look fine on your phone screen but become pixelated or blurry when enlarged for a banner is a huge no-no.
Solution:
Always source images at the highest possible resolution. If you’re using personal photos, try to get the originals. For stock photos, look for
high-res
or
4K
options. When resizing in
Photoshop
, if you have to enlarge an image significantly, it’s bound to lose quality. It’s better to use smaller, high-res images than one large, blurry one. Another common issue is
inconsistent color palettes or fonts
. A banner with too many clashing colors or a jumble of different fonts looks unprofessional and can be hard to read.
Solution:
Stick to a defined color scheme (2-3 main colors) and limit yourself to 1-2 font families. Use
Photoshop’s
Swatches panel
to save your chosen colors and the
Character panel
to keep track of font styles. Ensure your chosen fonts complement each other.
Poor readability
is a big one, especially for banners that need to convey information quickly. This happens when text is too small, has insufficient contrast with the background, or is placed over a busy image without proper support.
Solution:
Ensure there’s strong contrast between your text and its background. Use techniques like adding a subtle stroke or drop shadow to text, placing text on a solid color block or semi-transparent shape, or using the
Burn Tool
carefully on the background image behind the text to darken it slightly. Always test how your banner looks at different sizes, especially if it’s for web use.
Overuse of effects
can make a banner look cluttered and amateurish. While layer styles like drop shadows and glows are useful, too many or too strong can be distracting.
Solution:
Use
Photoshop
effects sparingly and subtly. A soft, small drop shadow is often better than a large, harsh one. Experiment with the opacity and color of your effects. Sometimes, less is more!
Ignoring composition and balance
leads to designs that feel
